Recent Posts
Understanding the Limitations of DIY Water Damage Restoration
4/23/2024 (Permalink)
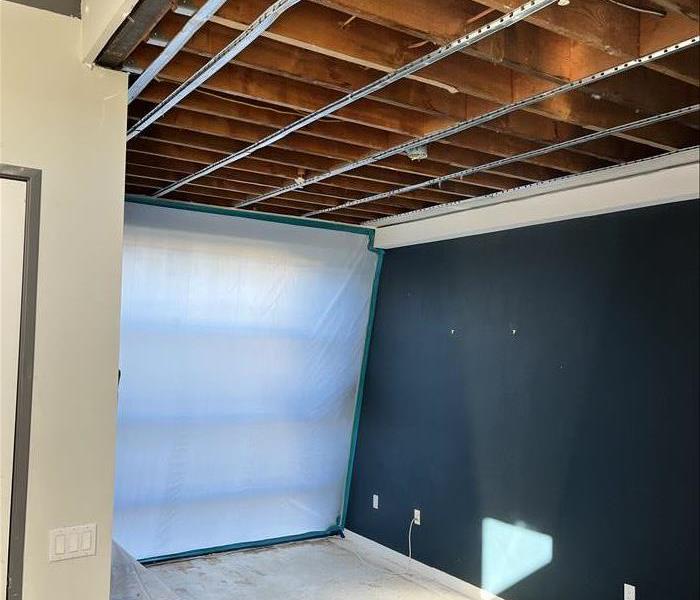 While DIY projects can be rewarding, water damage restoration is best left to the professionals.
Water damage in your home can be a stressful and overwhelming experience. Whether it's from a burst pipe, a leaking roof, or a natural disaster, dealing with the aftermath requires immediate and effective action to prevent further damage and mold growth. While the temptation to tackle water damage restoration on your own may be strong, it's essential to understand the limitations of the do-it-yourself approach.
Identifying the Scope of the Damage
One of the biggest challenges with DIY water damage restoration is accurately assessing the extent of the damage. Water can seep into hidden areas such as wall cavities, underflooring, and behind cabinets, causing unseen structural damage and promoting mold growth. Without proper equipment and expertise, it's easy to underestimate the scope of the damage and overlook critical areas that require attention.
Lack of Specialized Equipment
Another limitation of DIY water damage restoration is the lack of specialized equipment required for thorough drying and restoration. Professional water damage restoration companies like SERVPRO® have access to advanced tools such as industrial-grade dehumidifiers, air movers, and moisture meters, which are essential for drying out affected areas effectively. Attempting to use household fans and dehumidifiers may not be sufficient enough to remove moisture hidden within walls and flooring, leading to lingering dampness and mold growth.
Risk of Incomplete Restoration
Incomplete restoration is a common issue with DIY water damage cleanup efforts. Without proper training and experience, it's challenging to ensure that all affected materials are properly dried and restored. Moisture trapped within walls, floors, and ceilings can lead to structural damage over time, as well as mold growth. Professional restoration technicians have the expertise to assess the extent of the damage, develop a comprehensive restoration plan, and ensure that all affected areas are thoroughly dried and treated to prevent future problems.
Time and Energy Investment
DIY water damage restoration can be a time-consuming and physically demanding process. From extracting water and removing damaged materials to drying out affected areas and sanitizing surfaces, the restoration process requires meticulous attention to detail and significant effort. For homeowners with busy schedules or limited physical capabilities, DIY restoration may not be a practical or feasible option.
Cost Considerations
While DIY water damage restoration may seem like a cost-effective solution initially, it's essential to consider the potential long-term costs of incomplete or ineffective restoration. Mold growth, structural damage, and ongoing moisture issues can result in expensive repairs and renovations down the line. In contrast, professional restoration services may save you time, money, and hassle by ensuring that the job is done right the first time.
While DIY projects can be rewarding, water damage restoration is best left to the professionals. By understanding the limitations of the DIY approach and investing in professional restoration services, homeowners can ensure that their property is properly restored and protected from future damage. If you're dealing with water damage in your home, don't hesitate to contact SERVPRO of Fort Collins for expert assistance and peace of mind.
Why Cleaning Dryer Vents Is Crucial to Prevent Fires
4/16/2024 (Permalink)
 Don't underestimate the importance of cleaning dryer vents to prevent fires.
Your dryer may seem harmless enough, but did you know that neglected dryer vents pose a serious fire hazard? In this blog, we're highlighting the importance of cleaning dryer vents to prevent fires. By understanding the risks and taking proactive measures, you can protect your home and loved ones from potential fire disasters.
The Hazard of Accumulated Lint
Lint may seem harmless, but when it accumulates in your dryer vents, it becomes a highly flammable material waiting to ignite. Over time, lint buildup restricts airflow, causing your dryer to overheat and increasing the risk of a fire. Regularly cleaning your dryer vents is essential for removing this flammable material and maintaining optimal airflow.
Preventing Ignition
Dryers generate heat to dry your clothes, and if lint buildup ignites, it can quickly lead to a fire. The high temperatures inside the dryer create an ideal environment for combustion, turning lint into a dangerous fuel source. By keeping your dryer vents clean, you reduce the likelihood of lint ignition and mitigate the risk of a devastating fire in your home.
Improving Dryer Efficiency
In addition to fire prevention, cleaning dryer vents also improves the efficiency of your dryer. When vents are clogged with lint, airflow is restricted, forcing your dryer to work harder to dry your clothes. This not only increases energy consumption but also shortens the lifespan of your dryer. By removing lint buildup, you can optimize dryer performance and save on energy costs.
Protecting Your Home and Family
A dryer fire can have devastating consequences, resulting in property damage, injuries, and even loss of life. Taking proactive steps to clean dryer vents is a simple yet effective way to protect your home and family from this preventable hazard. Regular maintenance and cleaning can make all the difference in preventing dryer fires and ensuring peace of mind.
DIY vs. Professional Cleaning
While DIY dryer vent cleaning is possible, it's a good idea to leave this task to the professionals. Certified technicians have the expertise and specialized equipment needed to thoroughly clean dryer vents and remove stubborn lint buildup. Professional cleaning not only ensures a more effective result but also reduces the risk of damage to your dryer or vents.
Don't underestimate the importance of cleaning dryer vents to prevent fires. By regularly removing lint buildup, you can minimize the risk of ignition, improve dryer efficiency, and protect your home and loved ones from potential disasters. Whether you choose to tackle the task yourself or enlist the help of professionals, prioritizing dryer vent maintenance is a small investment that can yield significant returns in fire prevention and safety.
Unveiling the Truth: Black Mold Myths vs. Reality
3/14/2024 (Permalink)
 If you think you might have black mold in your home, give our SERVPRO of Fort Collins team a call!
Today, let's shed light on the often misunderstood topic of black mold. As seasoned professionals in the domain of molds, we’re here to debunk common myths and provide you with the straight facts. Whether you're a homeowner or someone curious about black mold, let's delve into the myths versus facts of black mold and navigate this often misunderstood territory together.
Myth #1: All Black Mold is Toxic
Not all black molds are created equal. While some molds produce mycotoxins that can be harmful, the mere presence of black mold doesn't necessarily mean it's toxic. Identifying the specific type of mold is crucial for accurate assessment.
Myth #2: Every Black Spot is Black Mold
Black mold isn't the only black-hued type of mold. Many molds can appear black, so jumping to conclusions based solely on color is a common mistake. Proper identification through testing is key to determining the type of mold present.
Myth #3: Cleaning Black Mold with Bleach Solves the Problem
Bleach might seem like a quick fix, but it's not always effective against mold. It can often contribute to the problem by not addressing the root cause—moisture. Proper removal involves eliminating the source of moisture and using appropriate cleaning methods.
Black Mold Always Requires Professional Remediation
While professional help is advisable for extensive infestations, not all cases of black mold necessitate a professional mold remediation service. Small, isolated incidents can often be addressed effectively with DIY methods, provided proper safety precautions are taken.
Mold Testing Kits Are Foolproof for Identifying Black Mold
Home testing kits can provide some insights, but they aren't foolproof. Identifying mold requires a trained eye and professional testing to determine the specific type accurately.
In conclusion, understanding the facts about black mold is crucial for effective management. By debunking these common myths, we empower ourselves to make informed decisions about mold in our homes. If you suspect black mold, approach the situation with clarity, and always prioritize safety in your remediation efforts. If you think you might have black mold in your home, give our SERVPRO of Fort Collins team a call!
The Differences Between Flood Damage and Water Damage
2/27/2024 (Permalink)
 Both flood damage and water damage may require professional assistance for effective restoration.
Understanding the differences between flood damage and water damage is essential for homeowners facing water-related challenges. In this blog, we will delve into the distinctions between these two types of damage, including their causes, insurance coverage, potential health risks, and necessary restoration approaches.
Causes and Sources
Flood damage occurs as a result of an overflowing river, heavy rainfall, or natural disasters like hurricanes. Water damage, on the other hand, is caused by internal factors, such as burst pipes, leaking appliances, or plumbing issues within the home. Understanding the different sources helps determine the appropriate response and insurance coverage.
Insurance Coverage
Flood damage is typically not covered by standard homeowner's insurance policies and requires separate flood insurance. Water damage caused by internal factors is usually covered, subject to specific policy terms and conditions. Familiarizing yourself with your insurance coverage can help mitigate potential financial burdens.
Severity and Scale
Flood damage often affects large areas and tends to be more severe, causing extensive destruction to homes and personal belongings. Water damage, while it can range from minor leaks to major incidents, generally affects localized areas within the home. Determining the severity and extent of damage helps in planning proper restoration efforts.
Restoration Process
The restoration process differs for flood damage and water damage. Flood damage restoration often involves water extraction, drying, disinfection, and comprehensive repairs. Water damage restoration focuses on assessing and repairing the source of water intrusion, drying affected areas, and conducting necessary repairs.
Preventive Measures
Preventing flood damage requires proactive measures such as proper drainage systems, flood barriers, and regular maintenance of your property. For water damage prevention, routine maintenance, prompt fixes of leaks, and adequate insulation are essential. Understanding these preventive measures can help mitigate the risk of damage.
Professional Assistance
Both flood damage and water damage may require professional assistance for effective restoration. Flood damage restoration usually involves specialized expertise due to the scale and complexity of the damage. Water damage restoration may also benefit from professional assessment and restoration services to ensure a thorough and safe recovery.
Recognizing the differences between flood damage and water damage is crucial for homeowners to respond appropriately to water-related incidents. Understanding the causes, insurance coverage, restoration processes, and preventive measures can help homeowners navigate the challenges of flood or water damage, ensuring a prompt and effective recovery.
Staying Connected: The Importance of Emergency Communication During Storms
1/3/2024 (Permalink)
As storms brew and skies darken, effective communication becomes a crucial lifeline for communities facing potential threats. Local alert systems play a pivotal role in disseminating timely information and ensuring the safety of residents. In this blog, we'll explore the significance of emergency communication during storms, focusing on the role of local alert systems.
The Need for Timely Information
Storms, whether hurricanes, tornadoes, or severe thunderstorms, can escalate rapidly, leaving little time for individuals to react. Timely and accurate information is the key to making informed decisions about evacuation, seeking shelter, or taking other necessary precautions. Local alert systems bridge this gap by providing real-time updates directly to residents.
Types of Local Alert Systems
Wireless Emergency Alerts (WEA)
WEA, also known as emergency alerts or Amber alerts, are short emergency messages sent by authorized government alerting authorities through mobile carriers. These messages include alerts about severe weather, local emergencies requiring evacuation or immediate action, AMBER alerts, and Presidential Alerts during a national emergency.
Weather Radio
NOAA Weather Radio (NWR) broadcasts continuous weather information directly from the nearest National Weather Service (NWS) office. These broadcasts provide up-to-date information on severe weather, including storms, tornadoes, and hurricanes. Weather radios are equipped with alarms that automatically activate during emergency broadcasts.
Emergency Alert System (EAS)
The Emergency Alert System is a national public warning system that allows the President to address the nation during emergencies. It also enables local authorities to provide emergency information, including severe weather alerts, imminent threats, AMBER alerts, and more, through radio and television broadcasts.
Local Community Alert Systems
Many communities have their own alert systems, often utilizing text messages, emails, phone calls, or social media to disseminate information quickly. Residents can sign up for these services to receive alerts specific to their area, including evacuation notices, road closures, and other critical updates.
How to Stay Connected
Register for Local Alert Systems
Ensure you are registered for local alert systems in your area. Many communities have dedicated platforms or services that allow residents to sign up for alerts. This information is often available on local government websites or through community outreach programs.
Enable Wireless Emergency Alerts (WEA)
Most modern smartphones are automatically enabled to receive Wireless Emergency Alerts. However, it's a good idea to check your phone's settings to ensure that these alerts are activated. This can typically be found in the "Emergency Alerts" or "Government Alerts" section of your phone settings.
Stay Informed Through Multiple Channels
Relying on multiple sources for information is a smart strategy during storms. Utilize a combination of local alert systems, NOAA Weather Radio, and mainstream media to receive comprehensive and up-to-date information.
Have a Weather Radio
Consider investing in a NOAA Weather Radio for your home. These radios provide continuous weather information and automatically activate alarms during emergency broadcasts, ensuring you receive critical alerts even if you're not actively monitoring the situation.
In the face of storms, staying connected through local alert systems is a non-negotiable aspect of personal safety. By taking advantage of these communication channels, residents can receive timely information, make informed decisions, and take appropriate actions to protect themselves and their families. In the storm's turbulent environment, effective communication is the lifeline that guides communities to safety.
Handling the Aftermath: A Guide to Hazardous Chemicals after a Fire and Proper Disposal Methods
11/21/2023 (Permalink)
Experiencing a fire in your home or business is a devastating event. Aside from the visible damage caused by the flames, there are also hazardous chemicals that can pose a serious threat. After a fire, it's crucial to understand which chemicals are hazardous and how to properly dispose of them. In this blog, we will explore some common hazardous chemicals found after a fire and provide guidelines for their safe disposal.
Soot and Ash
Soot and ash may contain various toxic chemicals, such as carbon monoxide, lead, and asbestos. It's important to avoid direct contact with soot and ash and use protective gear when handling them. To dispose of soot and ash, double-bag them in heavy-duty trash bags and seal them tightly. Dispose of them in a designated hazardous waste disposal facility or follow the local regulations for disposal.
Fire Extinguisher Residue
Fire extinguishers contain different types of chemicals depending on the type of fire they are designed to combat. Some extinguishers contain dry chemicals such as monoammonium phosphate or sodium bicarbonate. After using a fire extinguisher, contact your local fire department or hazardous waste disposal facility to find out how to safely dispose of the residue.
Cleaning Agents and Fire Suppressants
During the firefighting and restoration process, various cleaning agents and fire suppressants are used. These can include chemicals like ammonia, chlorine, or petroleum-based solvents. Proper handling and disposal of these chemicals are crucial. Follow the manufacturer's instructions for any cleaning agents used and contact your local hazardous waste facility for guidance on proper disposal.
Burnt Electronics
Electronic devices, such as computers, laptops, and TVs, can release hazardous chemicals when burned. This includes heavy metals like lead, mercury, and cadmium. It is recommended to contact a certified electronic waste recycling center to properly dispose of burnt electronics. These facilities can safely handle and recycle electronic components while minimizing the environmental impact.
Propane Tanks and Flammable Liquids
Propane tanks and flammable liquids, such as gasoline or paint thinners, can be extremely dangerous after a fire. Do not attempt to handle or dispose of these yourself. Contact your local hazardous waste disposal facility or fire department for assistance. They will have the necessary equipment and expertise to handle and safely dispose of these hazardous materials.
Remember, safety should always be the top priority when dealing with hazardous chemicals after a fire. Wear protective gear, such as gloves and masks, when handling any potentially hazardous materials. If you are unsure about the proper handling or disposal methods for specific chemicals, it's recommended to seek guidance from professionals or contact your local environmental agency.
In conclusion, understanding the hazardous chemicals that can be present after a fire and knowing how to properly dispose of them is crucial for the safety of both individuals and the environment. By following proper disposal procedures and seeking guidance when needed, you can help minimize the risks associated with hazardous chemicals and contribute to a safer and cleaner recovery from a fire incident.
Drying Techniques Demystified: Understanding Air Movers, Dehumidifiers, and More
10/24/2023 (Permalink)
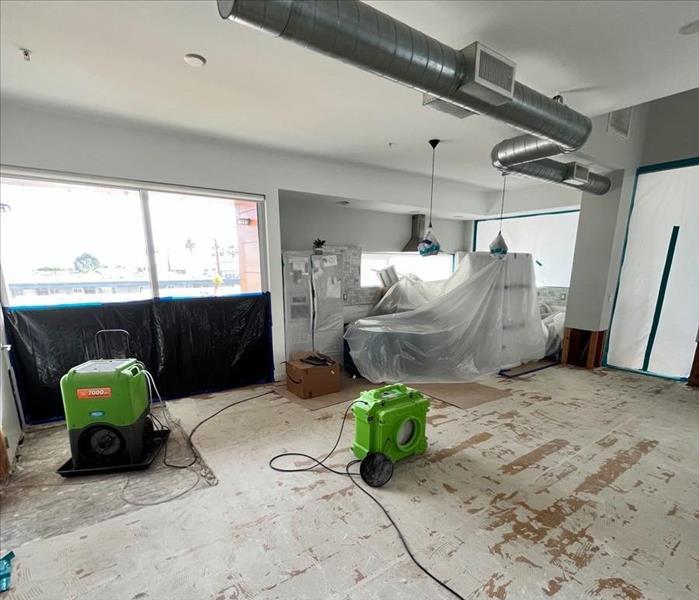 Proactive and thorough drying not only prevents further damage but also minimizes the risk of mold growth and other secondary issues.
When faced with water damage in your home, one of the most critical steps in the restoration process is proper drying. Effective drying techniques not only remove visible water but also address excess moisture in the air and structural materials. In this blog post, we will explore various drying techniques, including air movers, dehumidifiers, and more, to help you understand their importance in restoring your home after water damage.
Air Movers
Air movers, also known as blowers or air circulators, are essential tools for accelerating the drying process. These powerful fans create a high-velocity airflow that promotes evaporation by whisking away moisture-laden air and replacing it with drier air. By positioning air movers strategically throughout the affected areas, you can speed up drying time and prevent further damage caused by prolonged moisture exposure.
Dehumidifiers
Dehumidifiers are indispensable in controlling and reducing excess moisture levels in the air. They work by extracting moisture from the surrounding environment and collecting it in a reservoir or draining it directly. Dehumidifiers are particularly useful in high-humidity regions or during humid weather conditions. They help create an optimal drying environment by reducing humidity levels, which aids in the evaporation of water from surfaces and materials.
Heat and Ventilation
Applying heat and utilizing proper ventilation techniques can significantly contribute to the drying process. Warm air can hold more moisture, which encourages faster evaporation. By utilizing heating systems, such as space heaters or central heating, you can raise temperatures in affected areas to expedite the drying process. Additionally, ensuring proper ventilation by opening windows, using exhaust fans, or running HVAC systems helps remove moisture-laden air and introduce drier air into the space.
Moisture Sensors and Meters
To effectively monitor the drying progress, moisture sensors and meters are invaluable tools. Moisture sensors detect the presence of moisture within materials by measuring electrical conductivity, while moisture meters provide precise moisture content readings. These devices help identify hidden moisture pockets that may not be visible to the naked eye, ensuring thorough drying and minimizing the risk of secondary issues such as mold growth.
Desiccants
Desiccants are drying agents that absorb moisture from the air and surrounding materials. Common desiccants used during the restoration process include silica gel, activated alumina, and calcium chloride. Desiccants are typically used in enclosed spaces or contained areas where reducing humidity levels is crucial. They are particularly effective in mitigating moisture-related issues in confined spaces like closets, cabinets, or crawl spaces.
Injectidry Systems
Injectidry systems provide a specialized drying technique for inaccessible or hard-to-reach areas. These systems use hoses and attachments to inject warm, dry air directly into wall cavities, under flooring, or within ceiling voids. By targeting specific areas, Injectidry systems help ensure thorough drying and mitigate potential hidden moisture pockets that may lead to long-term damage or mold growth.
In the aftermath of water damage, employing effective drying techniques is essential to restore your home to its pre-damaged condition. By utilizing air movers, dehumidifiers, heat and ventilation, moisture sensors and meters, desiccants, and Injectidry systems, you can create an optimal drying environment that removes excess moisture from the air and structural materials. Proactive and thorough drying not only prevents further damage but also minimizes the risk of mold growth and other secondary issues. If you're dealing with water damage, don't underestimate the power of proper drying techniques in restoring your home and ensuring its long-term integrity.
Understanding the Impact of Winter Storms on Your Home
9/27/2023 (Permalink)
Winter storms in Fort Collins, CO, can bring a range of hazards, including heavy snowfall, freezing rain, and strong winds. These storms can impact your home in various ways, from roof damage to frozen pipes and power outages. Understanding the potential impacts of winter storms on your home is critical in taking proactive measures to protect your property. In this blog post, we will explore some of the common ways that Pacific Northwest winter storms can affect your home.
Roof Damage
During winter storms, heavy snow and ice buildup on your roof can cause significant damage. The additional weight of snow and ice can cause stress on your roof, leading to leaks, structural damage, and potential collapse. Strong winds can exacerbate the situation by causing ice and snow to shift, leading to further damage to your roof. It's essential to remove excess snow and ice promptly, engage with a roofing professional to inspect your roof, and take appropriate measures to safeguard against potential damage.
Frozen Pipes
One of the most common impacts of winter storms on your home is frozen pipes. When temperatures dip below freezing, the water inside your pipes can freeze, leading to cracks, leaks, and even burst pipes. This can cause significant water damage and expensive repairs. To prevent frozen pipes, ensure that your pipes are adequately insulated and that your home's temperature stays above 55 degrees Fahrenheit during the winter months. If you're leaving your home for a prolonged period, consider draining your pipes or leaving cabinet doors open to allow warm air to circulate.
Power Outages
Winter storms can cause power outages, leaving your home without electricity or heat. This can be dangerous, especially during prolonged periods of cold weather. In such cases, emergency preparedness is crucial. Consider investing in a generator, having extra blankets and warm clothing on hand, and stocking up on non-perishable food and water. Ensure that you have a working carbon monoxide detector before operating generators or alternate heating sources to avoid any dangerous build-up of fumes.
Structural Damage
Winter storms can cause significant structural damage to your home, especially in situations where the storm causes water to seep into the house. Long periods of exposure to moisture can lead to mold growth, which can cause health problems and compromise the structural integrity of your home. Ensure that your home's exterior is adequately sealed, gutters and downspouts are clear of debris to prevent water pooling, and that foundation vents are closed to prevent wind-blown debris.
Landscaping Hazards
During winter storms, trees, and other outdoor plants can pose hazards to your home. Heavy snow and ice buildup on trees and branches can cause them to break, potentially falling on your home and causing significant damage. Additionally, high winds can make trees unstable, leading to their uprooting. Ensure that trees around your home are healthy and well-maintained, trimming back branches that may pose a threat to your property.
Understanding the potential impacts of winter storms on your home is crucial in taking proactive measures to protect your property. Roof damage, frozen pipes, power outages, structural damage, and landscaping hazards are some of the common ways that winter storms can affect your home. Take steps such as adequate insulation, engaging with professionals to inspect your roof, and having an emergency preparedness kit to safeguard yourself against any potential damage. By being prepared and proactive, you can help ensure the safety and longevity of your home.
The Commercial Fire Cleanup Process: Restoring Your Business After a Devastating Fire
8/30/2023 (Permalink)
Experiencing a fire in your commercial property can be a devastating event. The aftermath not only brings physical damage but also disrupts your business operations. In order to resume normalcy as quickly as possible, it is crucial to have a thorough understanding of the commercial fire cleanup process. In this blog post, we will walk you through the essential steps involved in restoring your business after a fire.
Ensure Safety
The first and most important step in the commercial fire cleanup process is ensuring the safety of everyone involved. Before entering the property, make sure that the fire department has deemed it safe to do so. Be aware of any structural damage, weakened floors or walls, and potential hazards like electrical or gas issues. If there are any concerns about safety, do not attempt to enter the property without professional assistance.
As soon as possible after the fire has been extinguished, contact your insurance provider to report the incident and begin the insurance claim process. Provide them with all the necessary details and documentation, including photos, videos, and an inventory of the damage. Your insurance provider will guide you through the next steps and provide assistance in covering the cost of the cleanup and restoration.
Secure the Property
Next, it is important to secure the property to prevent further damage or unauthorized access. This may involve boarding up windows, covering openings in the roof, or installing temporary fencing around the perimeter. By securing the property, you can protect it from weather elements, vandalism, and theft during the cleanup and restoration process.
Before the actual cleanup begins, it is essential to conduct a comprehensive assessment of the damage. Work with a professional fire restoration company to assess the structural damage, as well as the extent of damage to equipment, inventory, and other assets. Take detailed photographs, videos, and written notes to document the damage for insurance purposes.
Remove Debris and Clean the Property
The next step in the commercial fire cleanup process is the removal of debris and the cleaning of the property. This includes removing charred materials, furniture, equipment, and any unsalvageable items. A professional fire restoration company will have the necessary equipment and expertise to safely remove debris and clean the affected areas. They will also address issues such as smoke damage, soot removal, and odor elimination.
If water was used to extinguish the fire, your property may also have water damage. Water damage restoration is an important step in the commercial fire cleanup process. It involves removing excess water, drying out the affected areas, and addressing any mold or mildew growth that may have occurred as a result of the fire-fighting efforts. Water damage restoration should be performed by professionals to ensure thorough and effective restoration.
Repair and Reconstruction
Once the property has been cleaned and dried, the repair and reconstruction phase can begin. This step involves repairing or replacing damaged structural elements, electrical systems, plumbing, and HVAC systems. It may also involve repainting, re-flooring, and replacing fixtures and furniture. Work closely with your insurance provider and a reputable contractor to ensure that the repairs are done correctly and efficiently.
Before reopening your business, it is important to have the property reinspected to ensure that it is safe for occupancy. Engage the services of a licensed inspector or fire marshal to conduct a thorough inspection. In some cases, you may also need to obtain a certification of occupancy before resuming business operations.
Commercial fire cleanup is a complex and multi-step process that requires careful planning and execution. By following these essential steps, and working with professionals, such as SERVPRO of Fort Collins, you can successfully restore your business after a fire and begin the journey of rebuilding and moving forward. Remember to prioritize safety, document the damage, and engage reputable professionals to ensure a successful cleanup and restoration process.
Cleaning and Salvaging Your Belongings After a Flood: Tips and Tricks
6/14/2023 (Permalink)
Flooding can be a devastating event that can cause extensive damage to your property and belongings. After a flood, it's important to take immediate action to clean up and salvage your belongings. Here are some steps to follow when cleaning your contents after a flood.
Assess the damage
Before you begin cleaning your contents, assess the damage and determine what can be salvaged and what needs to be discarded. Be sure to take photos of the damage for insurance purposes.
Wear protective gear
When cleaning up after a flood, it's important to wear protective gear, including gloves, masks, and boots. Floodwater can contain harmful bacteria and contaminants, so it's important to take precautions to avoid exposure.
Remove the water
Use a wet vacuum or pump to remove any standing water from your property. Open doors and windows to help with ventilation and drying.
Clean and disinfect
Thoroughly clean and disinfect all affected surfaces, including walls, floors, and furniture. Use a disinfectant solution or a mixture of bleach and water to kill any bacteria or mold. Dry out your contents using fans and dehumidifiers. If possible, move items to a dry, well-ventilated area to speed up the drying process.
Salvage what you can
Salvage any items that can be saved, such as clothing, books, and furniture. Be sure to clean and disinfect these items before using or storing them. Dispose of any items that cannot be salvaged, such as electronics, mattresses, and carpeting. Be sure to follow local guidelines for disposing of flood-damaged items.
Preventative measures
To prevent flood damage in the future, consider taking preventative measures such as installing flood barriers, waterproofing your basement or crawlspace, and elevating electrical systems and appliances. You can also create an emergency preparedness plan that includes evacuation procedures, emergency contact information, and a list of important documents and belongings to grab in case of an emergency.
It's important to note that some items may require professional cleaning or restoration services. This includes items such as artwork, antiques, and electronics. If you're unsure about how to clean or salvage a particular item, it's best to consult a professional. Additionally, be sure to document any damage and keep all receipts and documentation related to the cleanup and restoration process for insurance purposes. With proper care and attention, you can restore your property and belongings after a flood and move forward from this difficult experience.


 24/7 Emergency Service